There’s nothing worse than a lukewarm spa or a cold pool. So what do you do when the heater won’t heat?
Like any other appliance, one day everything is running smoothly and the next day, the heater might not run at all. But don’t panic over the fact that it’s more complicated to work on than a pool filter or pump. That doesn’t mean you can’t learn to do the repair.
A pool heater is composed of switches, components and other devices that turn the heater on and off, and keep the water at the desired temperature. When one of these fail, the heater may shut down permanently until it is fixed. Once you find out which part is keeping the heater off, it can be repaired or replaced.
Evaluate outside factors
It may take some sleuthing to discover the cause of a heater malfunction. Often the culprit is not in the heater itself. Thus, the first step to troubleshooting is not actually looking in the heater, but outside it. Evaluate these things first:
Check the circulation system. The No. 1 reason a heater will not fire is inadequate water flowing into it. Most heaters need a minimum of 40 gpm passing through before they will fire. (Some will fire at 10 gpm, but they wind up overheating or cycling.) Start the pump and check the pressure gauge; if the reading is higher than normal, backwash or clean the filter.
If the pressure-gauge reading is too low, check and clean out the pump pot and skimmer basket or even the eye of the pump impeller. If the pressure gauge reads “normal,” proceed.
Check the on/off switch. Gardeners or others may have turned the unit off.
Check the thermostat. It may be turned down too low. In an older heater that has not been used for several months, the contacts in the thermostat may be dirty. Try moving the knob back and forth several times to clean the contacts. (This does not happen in newer models.)
Check the gas valve. The last of the checks, make sure gas can go into the heater. Sometimes when a heater is shut down for winter, the gas to the heater will be turned off at the gas valve.
Examine the heater
If all of the above items check out, you should begin to examine the heater itself. Note: These are general guidelines; the techniques for troubleshooting pilot, ignition and safety control circuits are presented only to illustrate the logic behind heater troubleshooting; manufacturer literature must always be consulted before approaching any specific heater model.
Circuits in heaters are not difficult to troubleshoot once you understand that the components are wired in series, like a string of Christmas lights. Finding the bad “bulb” is a matter of progressing through the system and testing suspect parts in sequence until you locate the problem.
First, you must ascertain which type of pilot the heater uses. There are two basic types: millivolt systems and IID systems.
With the millivolt system, the pilot is on continuously as a standing pilot; the heater uses heat from that standing pilot to generate electricity to run its safety and control systems. These millivolt systems have no outside electrical hookups.
Check the pilot. Use a pocket mirror to see if the pilot is burning; never put your face or eyes where you could possibly get burned. Is it clean and free of obstructions that would prevent proper operation? If the answers are yes, dig a bit deeper.
Check the switches. If the pilot lights and all external functions and factors have checked out, the millivolt system’s inability to fire is likely to be caused by a malfunctioning component along the electrical path in the heater. Then the suspect parts are the pressure switch, high-limit switch, thermostat, gas valve and pilot generator. Here’s a four-step procedure:
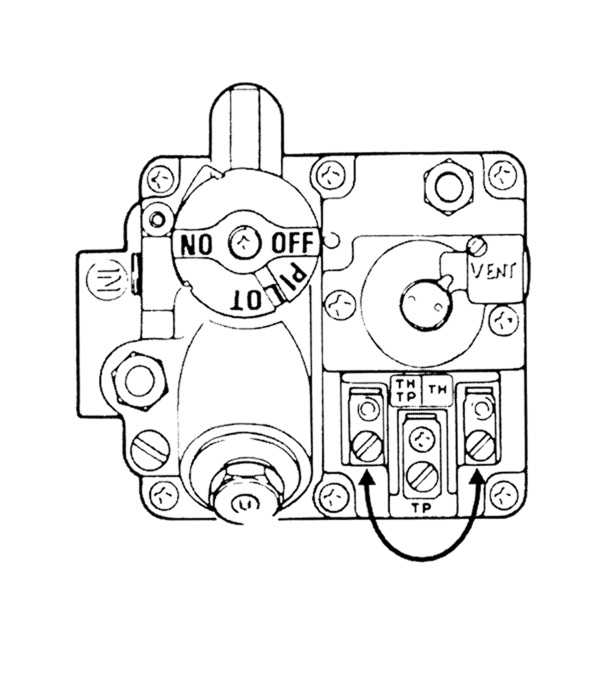
1. The first step along this diagnostic line involves sidestepping the gas valve by clipping a jump wire across the valve’s terminals (see Figure 1). This enables you to bypass the chain of control devices wired along the same circuit as the valve and to check the performance of the gas valve and pilot generator. Note: After troubleshooting any component, always remember to remove the jump wire!
The control components you’re bypassing (the pressure switch, the thermostat and the high-limit switch) are designed to prevent the gas valve from delivering gas to the main burner when an unsafe or improper condition exists.
To jump the gas valve, first turn off the main gas valve so the burner doesn’t come on. Then attach one end of the jump wire to the terminal connecting the thermostat and gas valve, the other to the connection between the gas valve and pilot generator; these may be labeled TH, TH-TP, thermostat or identified by color, depending on the manufacturer. If the burner lights, you know that the gas valve and pilot generator are good and the problem lies somewhere along the string of control devices.
If, however, the main burner doesn’t light, you have either a problem with the pilot generator, a wiring problem in connections for the pilot generator or a bad gas valve.
Manufacturers offer specific diagnostic recommendations for testing electrical current between these devices using a voltmeter. Usually, the pilot generator’s output should be anywhere from 250mv to more than 500mv with the circuit open — that is, when the heater is not running. The connection between pilot generator and gas valve should read more than 200mv with the heater firing. If it’s less than these levels, you probably have a bad pilot generator; more than that, the failure to light is usually attributable to a faulty gas valve.
Note, however, that a low reading also may be the result of faulty wiring. Again, a preliminary wiring check will help you avoid unnecessary effort in troubleshooting these components.
2. Next, jump across the pressure-switch terminals, thus electrically bypassing the pressure switch. If the burners fire, then you know that the pressure switch is not sensing proper water flow. If you know there’s proper flow in the system, then the switch is either out of adjustment or defective. Consult manufacturer literature for adjustment procedures.
3. If the burners do not fire when the pressure switch is jumped, move on to the thermostat. The first thing to check is that the toggle switch is in the ON position.
Depending on the unit, the thermostat may need to be removed from a mounting to access its terminals. In any case, the procedure is the same: Jump from one terminal on the thermostat to the other. If the burners fire, then you have a bad thermostat and it needs to be replaced. If they don’t, you need to move on.
4. The last diagnostic step with millivolt systems is a check of the high-limit switch or switches. If all of the previous checks have been performed properly, then jumping this switch (or set of switches) should result in the heater firing. If you replace the high-limit switch and still have a problem, check for proper water flow through the heat exchanger.
Deal with the devices
Intermittent ignition devices differ from millivolt devices chiefly in the fact that IIDs require an external electrical source to power their functions. Here, the pilot is sparked electrically only when it is needed to fire the burners.
As with the millivolt system, once external checks have been made, you can be fairly certain the heater’s failure to fire stems from a faulty component in the control circuit.
Troubleshooting an IID control system calls for an AC voltmeter with a 220-volt range or greater. As with the millivolt system, you’ll be testing a series of components to locate the faulty part. Set your voltmeter for the proper voltage — that is, above 24 volts.
• Check the transformer. Attach a voltmeter lead to one of the terminals for the system’s 24-volt transformer, then probe the other terminal with the second lead. When you make contact with both terminals, you should get a reading of 20-30 volts. If it is low, you may have a voltage problem or faulty transformer.
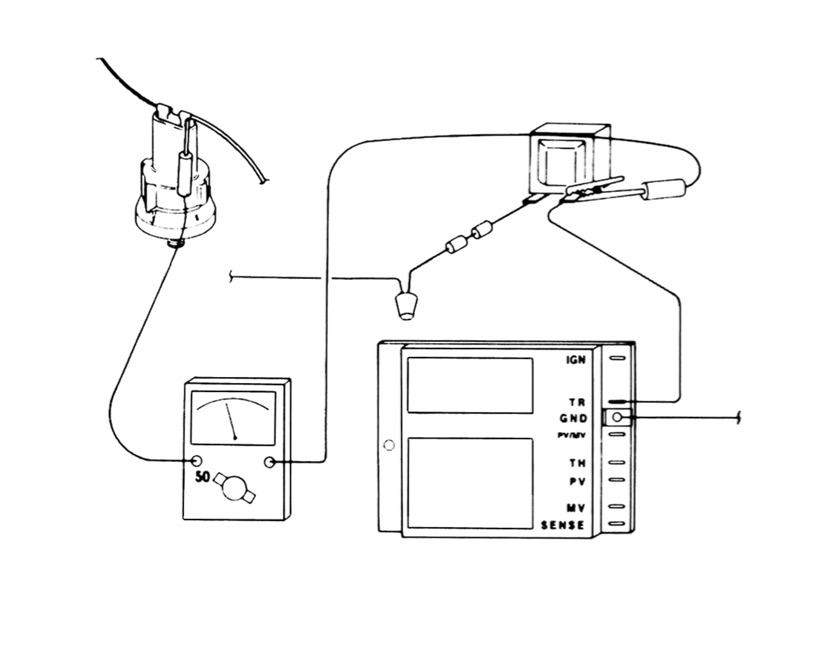
Figure 2: Pressure switch test in an IID system.
• Check the circuitry. With the lead from the voltmeter still in contact with the ground or common terminal on the transformer, check for voltage along the circuitry, starting with the safety fuse; use the other lead as a probe. Then move to the fusible link, the high-limit switch and the pressure switch (see Figure 2). If there’s voltage at these points, the parts are good. If not, they need replacing.
• Check the temperature control. Perform the same test on the temperature control, making sure that the control is in the ON position and that it is set to a temperature high enough to call for heat. If there’s voltage, the unit is fine.
If the heater is equipped with an electronic temperature control, the control’s sensor or probe should be checked following procedures recommended by the manufacturer.
• Check the ignition control. When an IID heater won’t fire, the ignition control is another suspect. Electrically, the ignition control is tested in the same fashion as the safety devices. First, verify that it’s receiving 20- to 30 volts. Then make a visual inspection of the unit and test for a spark at the pilot-burner electrode. Use caution around the electrode: It has low amperage, but a high voltage! (see Figure 3).
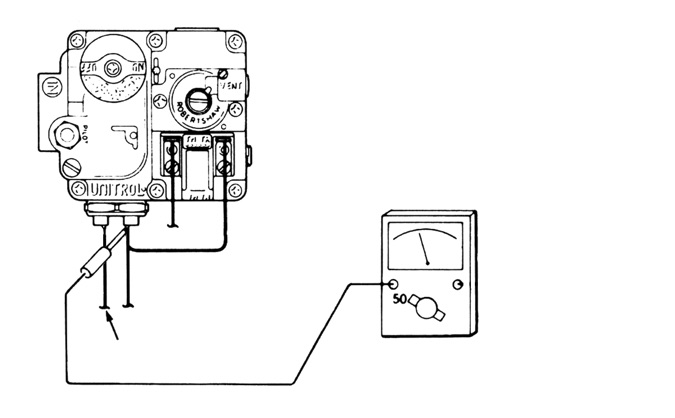
Figure 3: Ignition control
• Check all electrical connections. You want to be sure these connections are tight. Also, make sure the igniter electrode has a proper spark gap; this not unlike checking for the same in an automobile spark plug. Consult manufacturer literature for a proper spark-gap spacing.
• Check for a spark. With the thermostat set high enough to call for heat, you should have a spark at the pilot-burner electrode if all the controls are good.
If there’s no spark, some manufacturers recommend that you pull the wire off the ignition control and hold it approximately 1/8-inch away from the ground terminal. If there is no arc across the space, the ignition control should be replaced.
If you do have a spark, but the pilot doesn’t light, a good bet is that you have a plugged pilot assembly or a bad gas valve.
Handle an overworking unit
A heater that just won’t shut off can be particularly alarming. It may result in extremely high water temperatures and constitutes an extreme danger. To get to the root of such problems, you should:
• Check the gas valve. To do so, remove the wire running between the gas valve and the thermostat. If the heater doesn’t shut off, you have a faulty valve that must be replaced. If the heater does shut off, the gas valve is OK, but you know you have a control problem.
• Call for backup. At this point, heater manufacturers recommend that you bring in a specialist to troubleshoot the system because of the seriousness of the problem.
Check the panel
Troubleshooting heaters has been simplified with diagnostic lights, which some manufacturers include in their latest designs. Whether installed on the heater exterior or in its internal circuitry, the lights provide instant diagnostic information about the status of important system functions, including water flow, pressure, thermostat and gas-valve operation.
In all cases covered in this article, there’s a logical progression of checks and tests that will lead to a proper diagnosis — and cue you to quick action to bring the heater back up to speed.
Author: Robert H. Foutz Jr. is the owner of Purity Pool Service, based in Huntington Beach, Calif.