Here are three of the most common motor problems and step-by-step instructions on how to fix each one:
Humming and growling
Humming is usually a smooth, electrical noise; it’s not metallic-sounding. Growling sounds like two pieces of metal grinding together. You can hear the shaft trying to turn.
For growling, pop the motor’s center cap (opposite shaft end) and expose the end of the shaft. Look for excessive movement. The shaft should be able to rotate freely, but not side to side.
If the growling is caused by the bearings spinning in the housing or the rotor spinning the bearings, it means you’ve lost the bearing journals.
The bearing journals are the part of the shaft on which the bearings press. If the bearing journals on the shaft are lost, you’ll need to replace the entire motor. However, if the problem is in the end housing, you likely can swap it with an end housing from a used motor.
If the motor howls, it’s likely the bearings themselves are worn out, and it’s time to disassemble the motor to replace the bearings.
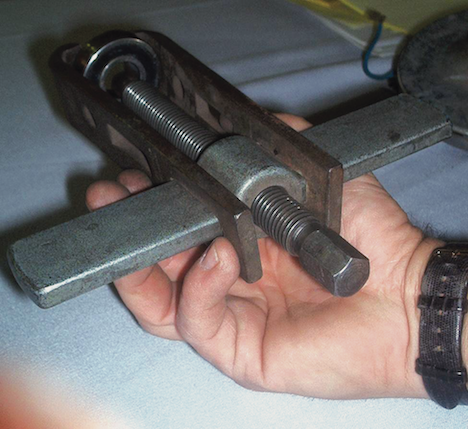
Photo 1: Use a bearing puller to remove the two bearings. Determine the size of the bearings and get replacements. When ordering, note the number on the bearing. These are generic parts, and no brand name is necessary.
To replace the bearings, you’ll need a bearing installer, which is essentially a piece of pipe the same size as the bearing. It’s used to press in the bearing.
When pressing the new bearing in, do it on the inside “race” — the part of the bearing on which the balls ride. If you pound on the outer edge, you can put a flat spot on the ball, and the motor will make a loud noise when turned on.
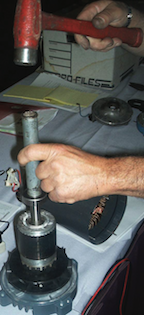
Photo 2: Slide the bearing installer over the shaft up to the bearing and pound the installer with a hammer (use one with weight; for instance, try a 2-pound hammer). The bearing is then pushed on the race and over the motor shaft.
When doing a bearing job, always replace the seals in the pump as well. After all, the most common reason the bearings were damaged originally is because the seals leaked.
If the motor hums when you turn it on, check to see if the shaft is frozen, the same way you did when troubleshooting the growling motor.
If the shaft spins freely, but the motor still won’t work and only hums, then you’ve likely got a bad start capacitor. (Keep a few spare capacitors on your truck.)
The points might also be dirty, or the windings could be bad. Identify the style of motor you have: capacitor start/induction run, capacitor start/capacitor run, or permanently split/capacitor run. The first two use an electrolytic start capacitor that has a variable microfarad rating, so replacing these capacitors doesn’t have to be exact.
On A.O. Smith motors, for instance, screws hold a set of points in the six o’clock position. To clean them up, slide a small piece of sandpaper between the points and let the spring load close on it. Rub the sandpaper gently back and forth. Afterward, make sure the points are still connecting. Tighten them if necessary.
Retry the motor. If it still hums, replace the capacitor switch. If there are no positive results, it’s time to replace the entire motor.
No sound, no movement
The opposite of humming and growling is when you turn the motor on and nothing happens — there’s no sound or movement. Use a process of elimination to discover the problem.
Put the equipment controls in the manual mode (not automatic), so you can turn them off and on at will. On older systems with manual time clocks, visually check to see that the time clock is running. If it isn’t running, either the clock is bad or no power is getting to it. Check the breakers.
Turn the pump motor on. If it does nothing, usually no power is getting to the motor.
Examine the motor connections to the terminal board. Check to see if a wire is loose at its connection. Sometimes, a wire can burn right off the terminal board (known as a high-resistance connection). If the connection seems OK and the motor still does nothing, turn the system off again.
Disconnect the motor wires from the terminal board and isolate them so they don’t touch anything. Turn the motor back on and use the voltage meter to check if any power is coming through. Touch one leg of the meter to one of the motor lines, and the other to the ground or neutral wire. This will show you power to ground. On a 240VAC system, both lines will show you 120VAC to ground. On a 120VAC system, you will only have power from one leg to ground.
Once you’ve determined that there is power to ground, check to see if it’s the correct voltage. Touch one leg of the voltmeter to each of the two motor power lines. This will give you the actual voltage, and allow you to determine if one of the lines is open or not. You want it to read within 10 percent of what the motor is rated to do.
If you get a satisfactory reading, use your ohmmeter (or set your multimeter to “ohms”) to test for continuity. Touch each of two line terminals on the motor with one of the terminals of the ohmmeter. If the meter registers no continuity or high ohms (in a range from 0-200), then either the motor’s coils are bad or the overload has been lost. (The overload is a thermal-protection device rated to run within a certain amp range. If the temperature goes beyond those parameters, the overload can die.)
Note: When using the ohmmeter with the motor off, you’re actually checking the windings and overload. The windings create a magnetic field. If the meter has no readings, it means the coils have shorted out or the overload has tripped and is not resetting.
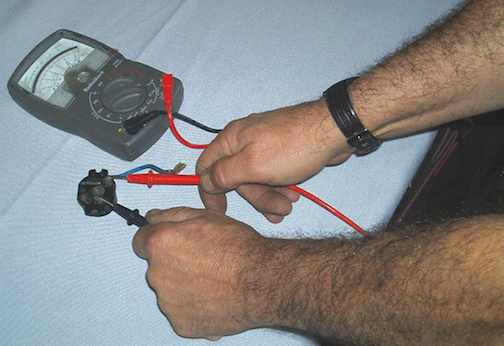
Photo 3: To locate the overload, you may need to take the motor apart. Once you find it, disconnect two of the leads coming from it (there are usually three) and leading to the terminal board. Isolate the overload so you can test the circuits in it. Use the ohmmeter. Put one leg of the meter on one of the three overload leads and place another on the other two leads together. Any post on the overload should indicate a circuit. If not, then replacing the overload can be tough. Getting replacements is nearly impossible through pool supply houses. Your local electric motor shop may have more available sources to track down the part.
You can bypass an overload for test purposes to make sure the motor doesn’t draw excessive amps before you order the part. Never leave an overload bypassed; it exposes you to liability if something happens.
If the overload has a complete circuit, turn your attention to the main coils of the motor and search for bad winding — or more precisely, a hole blown in the winding. If you find a hole, you’ll need to replace the entire motor.
If the overload has a circuit and the windings appear intact but have no circuit, the chances of you finding a hole are nil. The problem has to be with the coil, but it’s in a spot that you can’t reach. Once you’ve determined that the coils are no good, it’s time to replace the entire motor. Otherwise, you’d just be wasting your time and that of your customers.
Dead short
If you turn on the motor and the breakers trip, you have an entirely different problem.
Disconnect the power lines from the motor and turn it on again. If the breakers trip again, you know you have an electrical problem, and it has nothing to do with the motor. It’s time to bring in a licensed electrician.
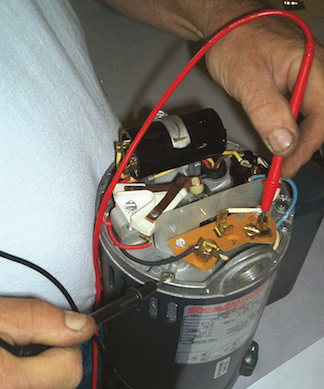
Photo 4: If the breakers don’t trip, turn the power off. Place one leg of the ohmmeter to one terminal and another to the motor casing. You are looking for a dead short. If you have a circuit, then you know something went bad (probably the windings blew), and you need to replace the entire motor.