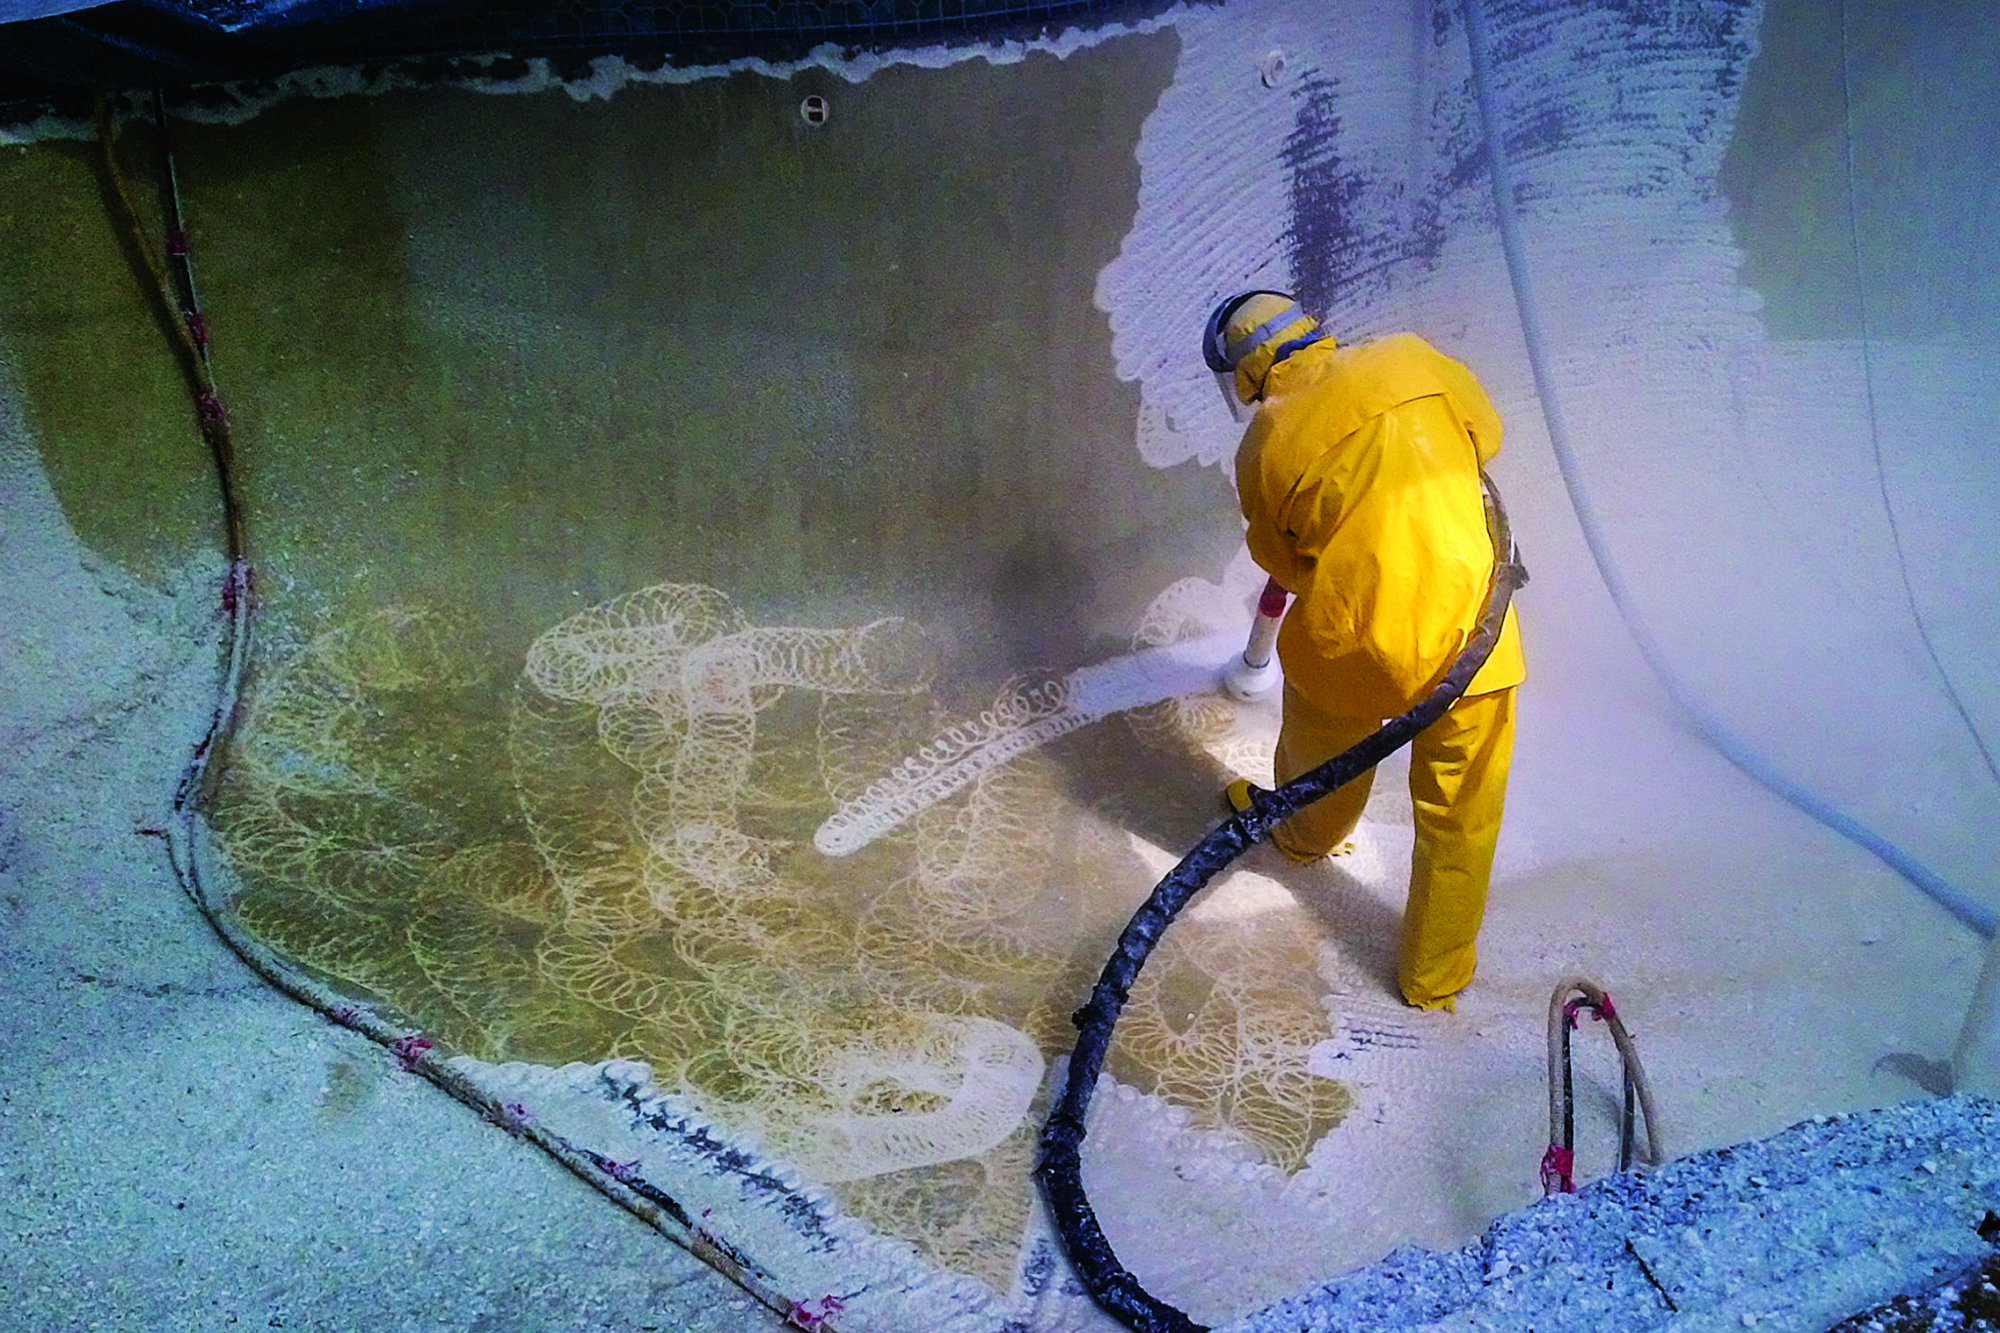
Crews gear up for safety by wearing a rain suit and head gear when they water jet.
Regardless of the interior finish being used on a pool or spa, proper preparation is crucial. Especially on an existing vessel, the application of the material will only be as successful as what’s underneath. The new surface must adhere properly to the old, and the old material must be suitable to receive the new. Different plasterers use different means — whether it be chipping the old material away with jackhammers and chisels, etching the surface with sandblasting and water jetting, applying a bond coat to help the finish adhere — or a combination. But always, the contractor must create the right conditions for a perfect bond while causing the least damage to the shell. Here, professionals offer advice and observations on three methods — chipping, applying a bond coat, and the newest method, water jetting.
CHIPPING THE FINISH
Plaster demolition isn’t pretty. Sometimes this becomes too apparent in the finished product.
“I’ve seen pools that were stripped that looked like they threw hand grenades in there,” says Kevin Wallace, president of Underwater Unlimited Inc. in San Diego. “They just gouged them to death.”
It isn’t just the aesthetic of a poor chip-out that bothers him, but the fact that many actually expose the rebar. “The gunite or shotcrete is the muscle of the pool, and if they’re taking out big chunks, it could be a problem,” he says.
The key is to remove the plaster without too much gouging. If the remaining material shows too many different thicknesses, it won’t hydrate consistently, which could result in mottling.
Part or full?
Partial chip-outs generally are reserved for cases where the crews will apply a bond coat. In these cases, plaster should be removed from immediately under the tile line and around fittings, so the new finish can be gradually feathered in and wrapped around penetrations so it sits at the same elevation all around and helps prevent leakage or water migration behind the tile.
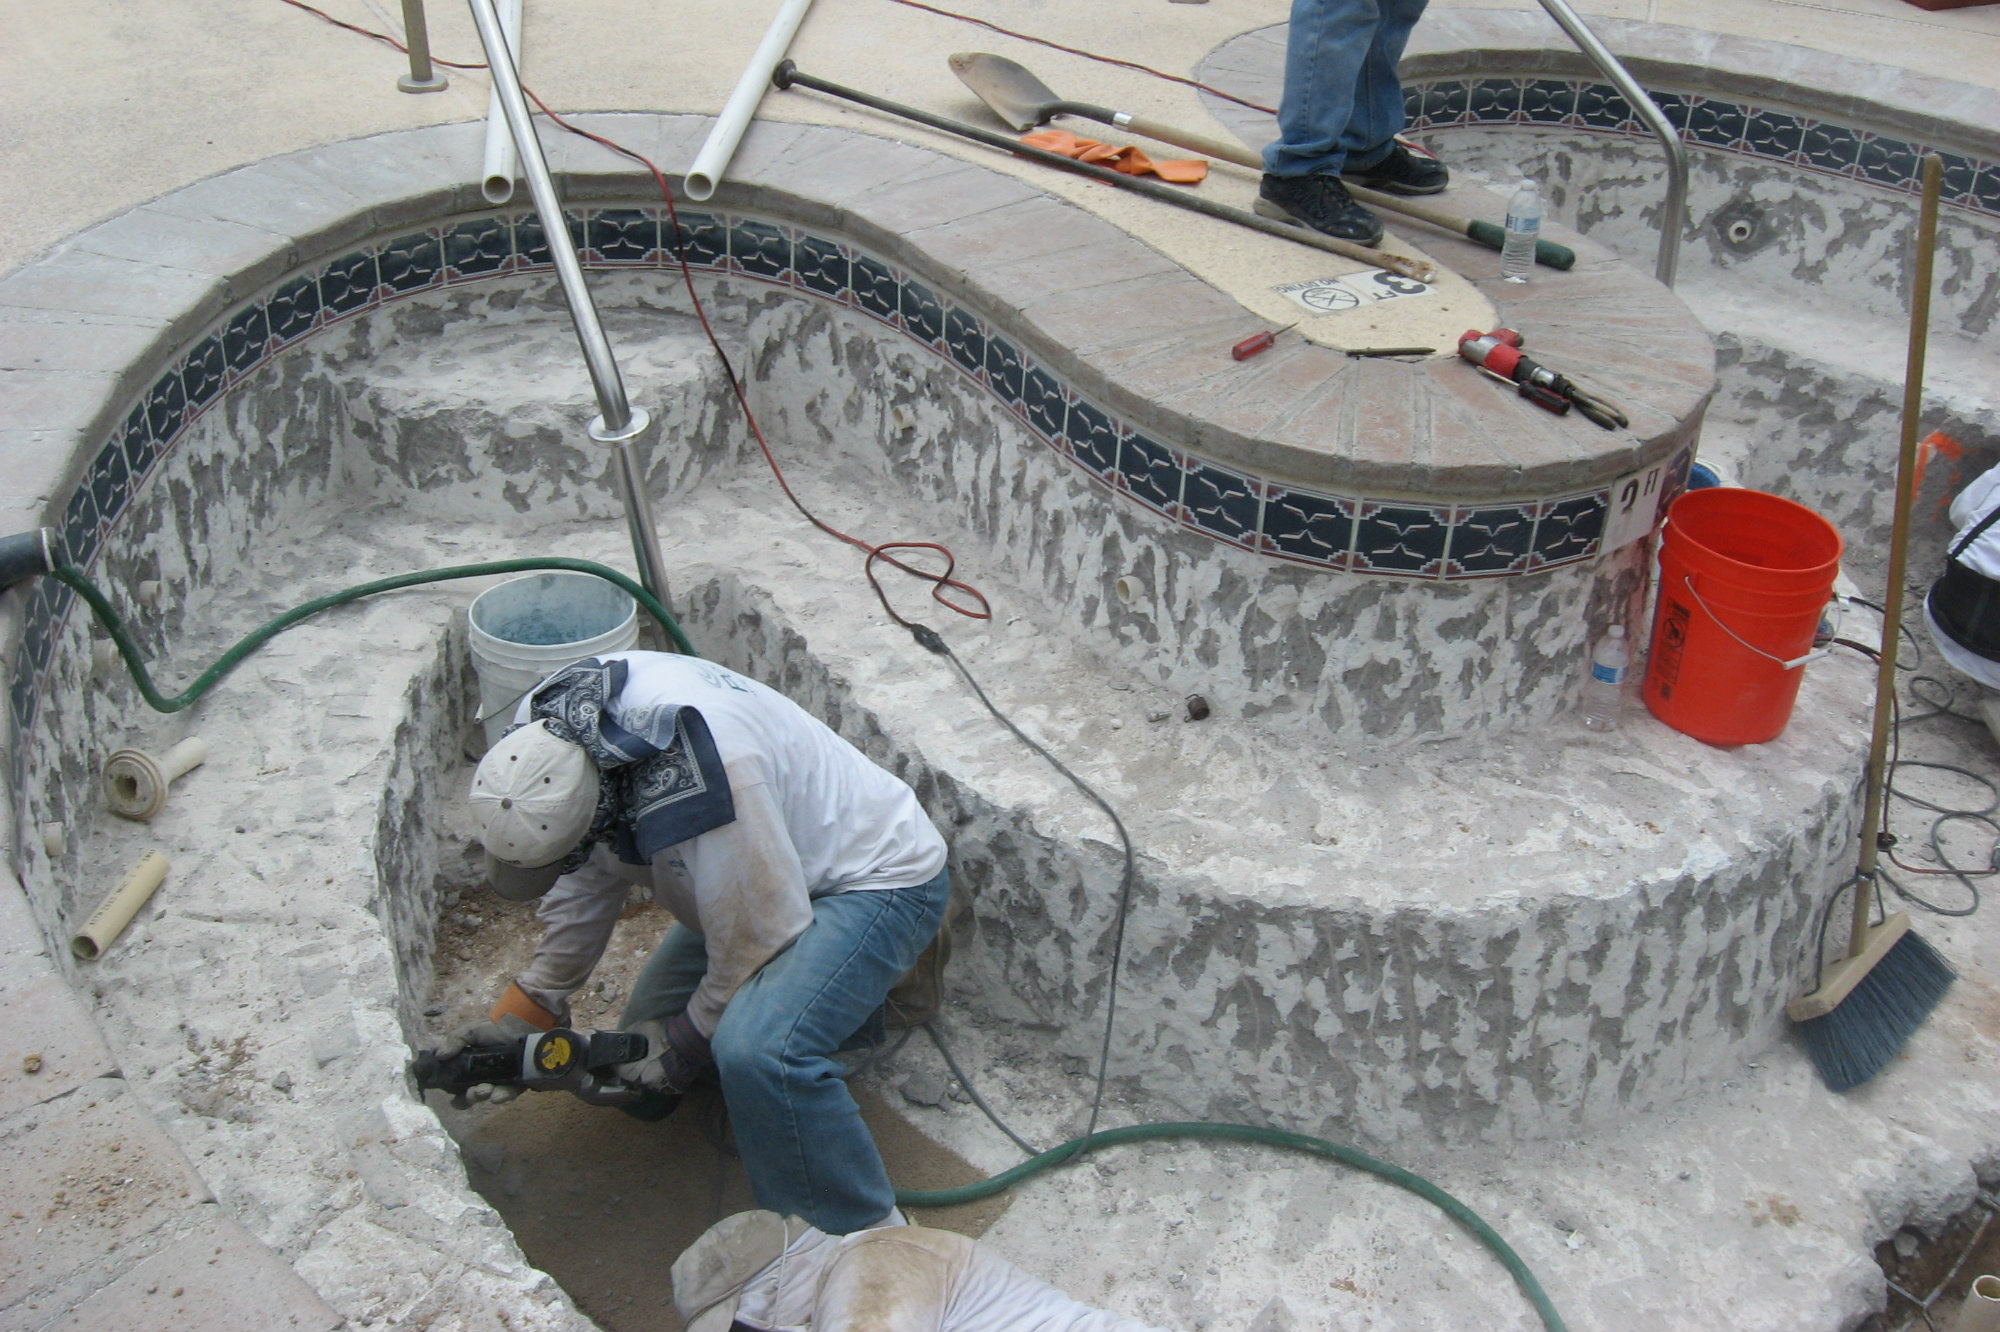
Some chipping must be performed around the tile lines and fittings to prepare for a bond coat. Less powerful equipment is used on walls.
As for the tile line, professionals saw cut at least once immediately underneath, at the joint, to help the material come off cleanly and minimize damage to the tile. Others add a second, parallel saw cut 3 to 12 inches below the first, then knock out the material between cuts. “It comes out in a small section,” says Edgar Sanchez, chief operating officer of Modern Method Gunite Inc., a Houston-based gunite and plastering contractor. “It’s more of a controlled area that you’re taking off. After that, I can get more aggressive [farther] down.”
Tape over the tile to protect it from the impact.
As for tools, some use an angle grinder to make the cuts while others uses hand grinders with a 4-inch diamond blade.
How deep to chisel depends partly on the type of new finish being applied. Plaster and finer exposed aggregates will sit about 3/8-inch thick, so less chipping is needed under the tile. For pebble or other materials applied in thicker layers, a greater amount of space should be opened up, leaving ample room to feather in the new material to sit flush with the tile surface.
Crews use a similar technique around the fittings, placing a cut approximately 6 inches outside the fittings, then removing the finish material. For floor returns or in-floor cleaning heads, some professionals prefer to cut approximately 12 inches out.
Next, check for hollows — areas where debonding or delamination occurred. Delaminated material must be removed, not replastered over. To find these spots, drag a chain, rod or piece of rebar across the surface and listen for a hollow sound. “It’s scratch, scratch, scratch, and then you hit a hollow area and it sounds like you’re tapping a bucket,” says Shawn Still, general manager of Olympic Pool Plastering in Norcross, Ga.
Regarding full chip-outs, contractors generally do not perform them when planning to apply a bond coat. There are exceptions, however. Some will if more than 10 percent of the pool is debonded. Others wait until it is closer to 25 percent. If there are multiple layers of plaster, Sanchez removes everything. “You want to chip off the top two layers so you come back with one,” he says.
Some do full chip-outs when there’s an in-floor cleaner, since so much cutting and chipping would be required around all the fittings anyway. Others do this for renovations more extensive than a simple resurfacing.
Important techniques
Whether performing a complete or partial chip-out, certain techniques help remove plaster while leaving shotcrete intact.
First, avoid the most frequent mistake — rushing the job, which can lead to removal of too much material. Though tempting, do not employ stronger jackhammers than necessary. “We use a 60-pound [pneumatic] hammer, and that will do less damage,” says Jay Eaton, president of Cal Plastering in Phoenix.
Still’s crews, who use electric jackhammers, work with 30-pound models at most. “It takes a little bit longer but puts a lot less stress on the substrate,” he says.
Around tile, use less powerful equipment to avoid shattering.
Work with flat chisels rather than pointed. While slower, it reduces pocks and helps control the amount of material removed.“It’s like shaving — you can run a flat chisel along the wall more effectively and just kind of take off what you need,” says Peter Langevin, CEO of Simply Pools in Fountain Valley, Calif.
Workers can use wider chisels — 6- to 7-inches — on the floor, and go with a smaller handheld gun for the walls, steps and benches to protect the tile and fittings.
Optimally, the flat chisels should be held at an angle of approximately 45 to 60 degrees to chip slightly sideways. “Every time you go straight down you’re creating a divot,” Sanchez says.
To remove the material efficiently and with minimal damage, frequently sharpen the tools. How often depends on the hardness of the material being chipped. All points and chisels should at least be sharpened before each job. When removing harder surfaces such as pebble, crews should sharpen more often.
USING BOND COATS
Lately, some are finding a bond coat more necessary.
“Years ago we used to do a standard plaster finish [and] roughen the surface enough to get a decent bond on it,” says Kevin Ford, president of Pool Builders Inc. in Davie, Fla. “But with the newer finishes it is much harder to get a rough enough finish in order to achieve a good bond with the new surface.”
Sometimes, the cheapest and easiest method is to apply a bond coat, a cementitious material meant to form a physical and chemical bond with the new finish so it stays put.
Preparing the surface
While applying a bond coat is one of the easiest preparation methods, it isn’t always the right one. The old plaster must be in good enough shape to support the new. If there is a lot of delamination or the material comes apart during a power wash, the old material likely needs to be removed.
On the other hand, a bond coat may be the best way to go if the pool has already undergone one or two chip-outs, which often take some shotcrete or gunite with it.
For this method, the surface first must be roughened up and prepared to help the bond coat fuse with the old surface. To this end, some prefer acid washing, others sandblasting. While the crews do this, pieces of old material may peel back. That must be removed to secure material.
Next, the surface should be cleaned. “Even if you sand blast it, you have to make sure all the sand, grit and soft materials are completely off,” says Alan Smith, owner of Alan Smith Pools in Orange, Calif. “If you acid wash it, all the acid has to be neutralized.”
Make sure the bond coat you choose is suitable for pools and spas in particular — not just submerged applications. Also, do not make your own bond coat. That may work for some, but those individuals generally have extensive knowledge of the various components and their chemistry. For most, this results in failure.
When mixing the product, do not add more water than recommended. This may stretch the product, but it also weakens the coat so it won’t form the peaks needed for a rough texture.
Weather is important during application. On hot days, the coat must be placed quickly. Experts recommend finishing before the air or substrate reach 90 degrees. Also, beware of working when fog or rain are imminent because cold, damp weather delays setting and may compromise effectiveness.
“On many products, polymers usually don’t cross link or coalesce under 50 degrees,” says Greg Garrett, owner of Applied Materials Technology in Chandler, Ariz. “It won’t harden and serve a viable function.”
Application Technique
The bond coat material can be brushed, rolled or sprayed, with each method requiring a different technique.
Brushing is generally the most economical, since the tools come cheap and the method doesn’t waste material. When doing this, applicators should essentially throw the bond coat on by snapping the brush toward the surface, forming small peaks.
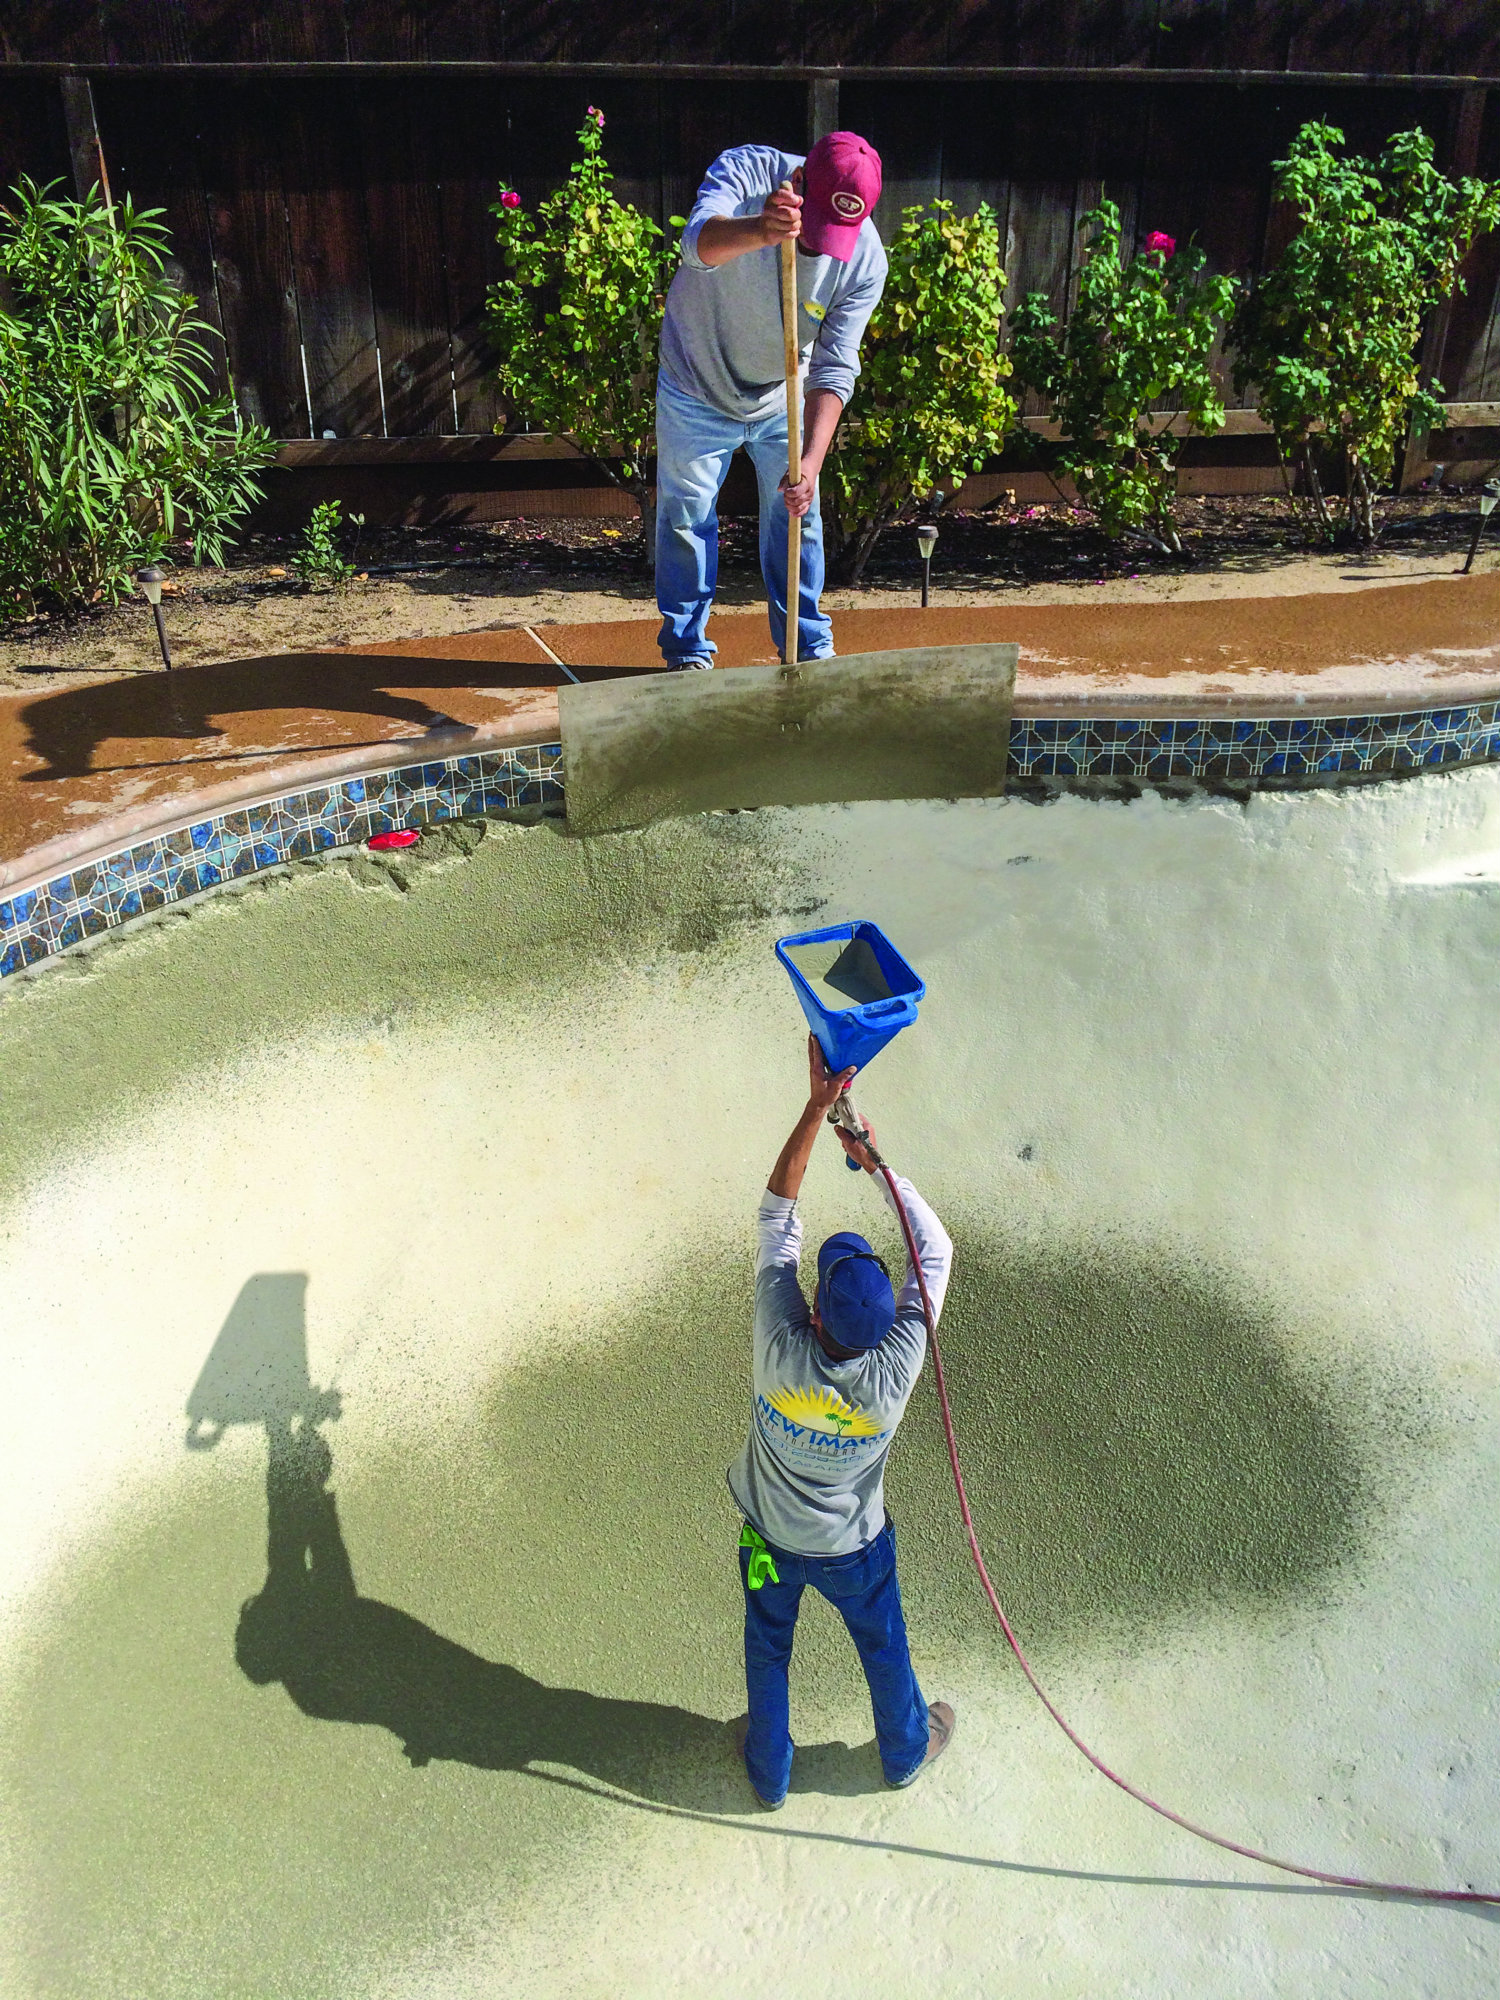
A properly adjusted spray gun can make it easier to achieve the perfect stippled texture of bond coat. A hopper gun is held perpendicular to the surface.
Rolling also can be performed without a large upfront investment. The bond coat is placed with thick-nap paint rollers, which help create a peaked texture. This method involves easier clean-up and allows for plenty of control in application, Ford says, however, it can use up more material.
Spraying is pricier because of the gun, but it’s also faster, can use less material and, when adjustments are right, automatically leaves a highly textured, stucco-like surface. When spraying, professionals should hold the gun perpendicular to the surface or the material might bounce off.
In addition, the compressor must be set to release the right amount of air. Too much causes too fine a spray; too little will create a material that doesn’t peak up well. The correct setting depends on factors such as the size of the gun and its orifice, so crews must make adjustments until the consistency is just right. Otherwise, the material will behave like shotcrete: Pieces resembling rebound will bounce off the walls, and the remaining material may not be strong enough.
Whichever method is chosen, it should leave a surface that is rough enough to allow a physical and chemical bond. Additionally, the coat should be uniform and level throughout, so the material can set consistently, perform evenly, and leave a level foundation for the new finish.
Crews may need to combine techniques to work around different elements.
For instance, simple fittings such as light niches can be covered with tape so that the applicators can simply spray over them. However, features such as rockwork that dips into the pool may be too complicated to tape. Here, Smith’s team combines techniques. “We’ll roll it maybe a foot down [from the rockwork] and then spray,” he explains. This allows greater control when they work near the rocks.
Once the coat is completely applied, it should be left for at least a day, but no more than three. If it sits too long, it won’t be able to form a chemical bond with the finish material.
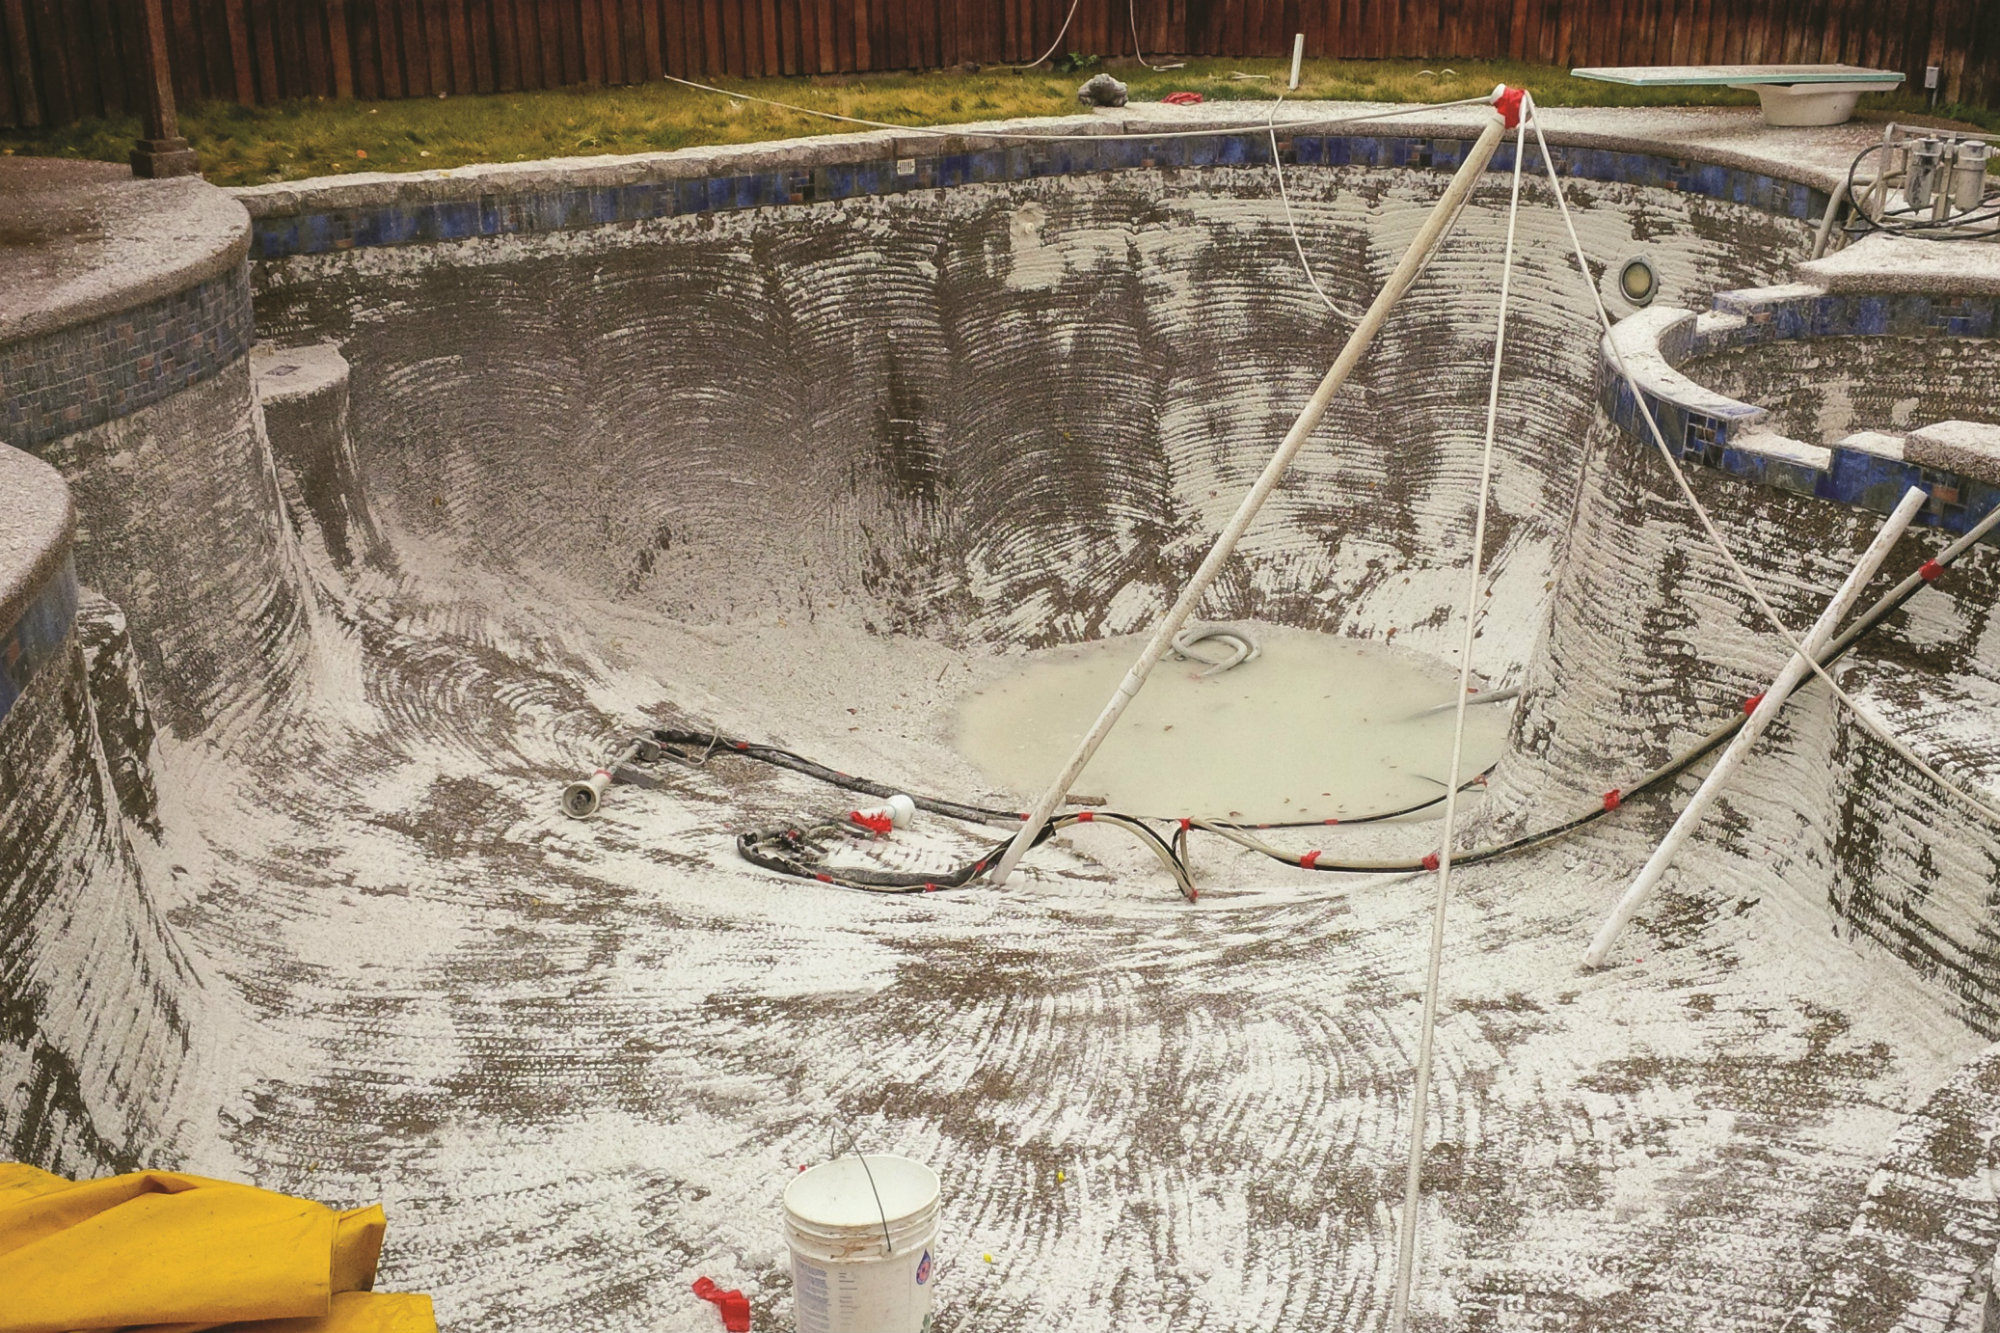
WATER JETTING
Some companies choose sand-blasters to etch the existing surface before applying a bond coat, new plaster or aggregate finish.
While that method has a long history, some firms are investing in a newer, albeit more expensive, solution: water blasting.
“It’s the most intense pressure washer you’ve ever seen,” says Still. “You have to carry it on a trailer because it weighs about 4 tons. It will convert 3 gallons of water a minute into 40,000 pounds per square inch [of pressure].”
This method is similar to the sand blast, only cleaner. After water blasting a surface, crews use a power washer to blow splatter and debris back into the pool, acid wash the vessel, and pump everything out. “You’re not shoveling out sand, wheelbarrowing it out or hauling it off to a dump,” says Dave Schilli, president of St. Louis-based Schilli Plastering Co. Inc.
The pressure also blows out the delaminated or hollow areas.
However, this option is a significant investment — more than $100,000, and in some cases topping $200,000 — and it can be dangerous. Workers must wear body armor head to toe. “It’s not something that you hand to the average bear,” Langevin says. “There has to be some training involved.”
The system is gaining popularity, but it means different things to different applicators.
The basics
Water jetting, also called water blasting, uses a pump to push water through a hose and out a jetted wand at high pressures. The concept was adapted for pools and spas relatively recently, but has long been used for paint removal and pipe cleaning.
For maximum impact, the nozzle can be held perpendicular to the wall. To avoid a mess, an angle may be better.
Some professionals rely on water blasting to remove one or more layers of plaster, while others just use it to rid paint or to etch an existing surface.
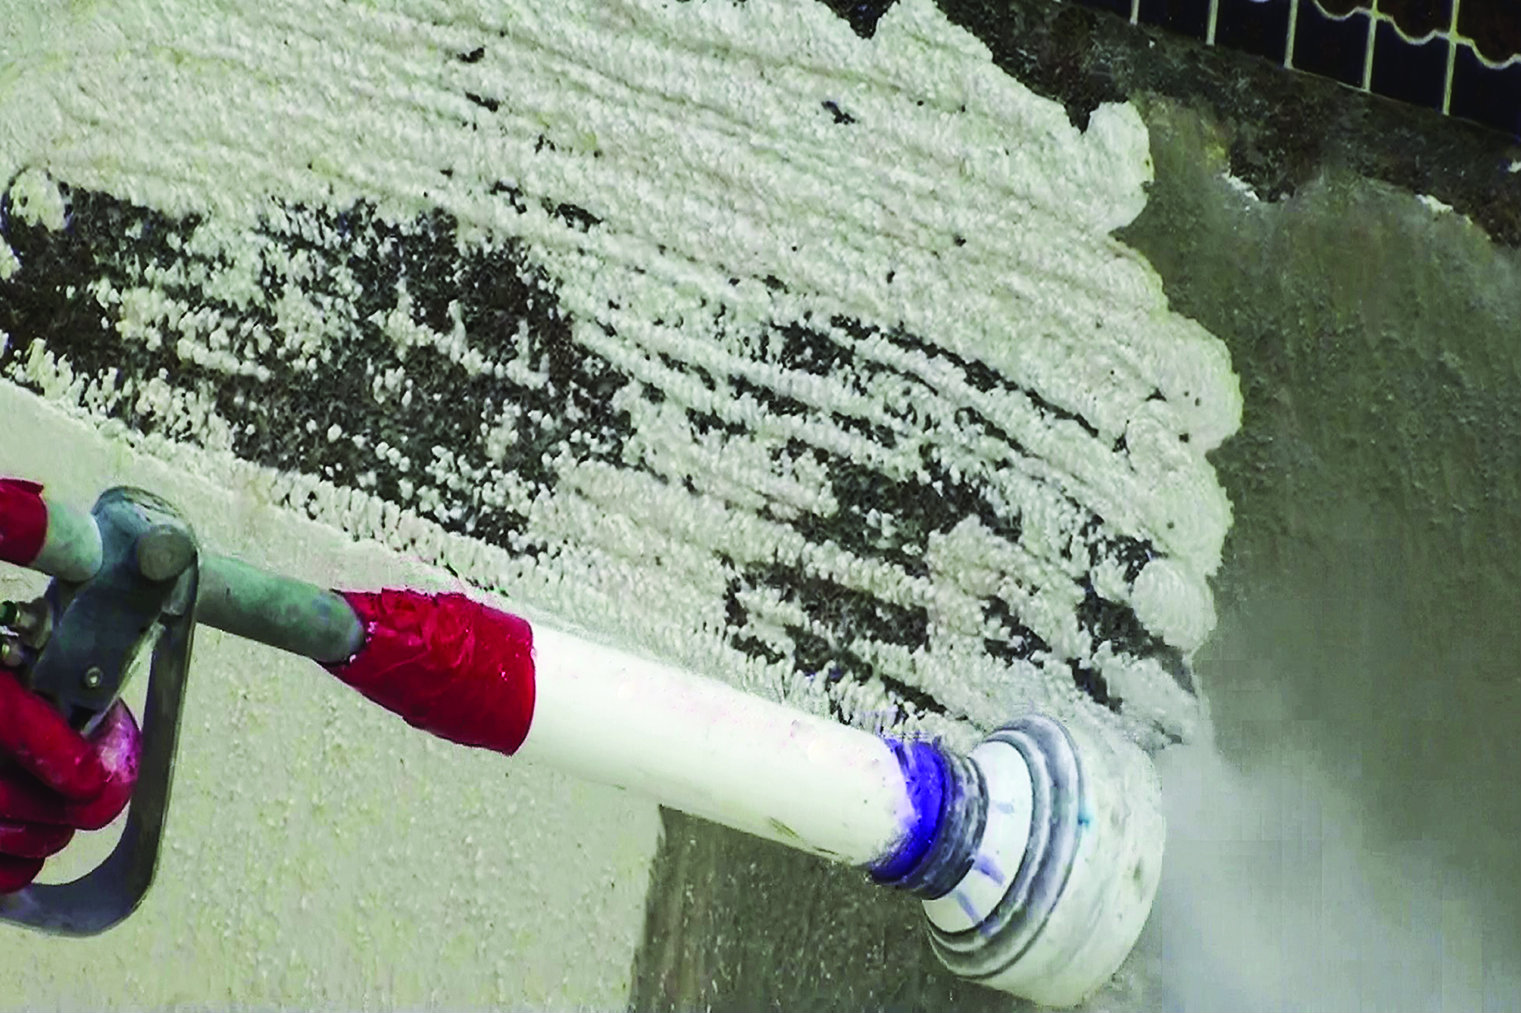
Systems vary in the amount of pressure they can exert, from approximately 10,000 to 40,000 psi. The lower pressures generally are suitable for removing paint and etching existing surfaces. The highest-pressure systems perform more intense etching, so some companies feel comfortable bypassing the bond coat altogether. They also can accommodate more than one worker.
“You can use two wands at the same time with a 40,000-psi system, so you can get it done twice as fast,” says Bob Chiapelli, president of Poolside Plastering in the Greater Philadelphia area.
Ultra-high-pressure systems also move the water so quickly that it creates heat, making the pool cleaner. “The water, because of friction … reaches 180 degrees,” says Greg Musgrove, owner of G&B Tile and Plaster Ltd., in the Dallas-Fort Worth area. “So you’re cleaning with very high pressures and very hot water. You can’t get a better clean than that.”
Some plasterers, particularly those using 10,000- or 20,000-psi models, may still want to add a bond coat before applying a new finish. In those cases, water jetting replaces sandblasting as a means to prepare the surface for the bond coat.
“[The manufacturer] has told us that as rough as it is, you really don’t need to put on a bond coat,” Schilli says. “But for the couple hundred dollars that you spend in bond coat material and application, it’s just not worth it to be taking a risk.”
Schilli started out with a 10,000-psi system, but then outfitted it for more power. “When we converted a 10,000-psi to a 20,000-psi, we were able to roughen up the surface a lot easier, a lot better,” he says.
A rougher etch is left by higher-pressure systems.
These professionals report that water blasting is much faster than the other options. With the 40,000-psi system, Musgrove’s crews often prep and plaster a pool in a day. “When I would use a bond coat … it would take me 2 to 2½ days to get the pool prepared,” he says. “With a water jetting machine … on a pool that’s been painted, I can prepare it in the morning and plaster it in the afternoon the same day.”
For those professionals who choose not to apply a bond coat, weather becomes less of a factor, since there’s no concern about how the temperature or humidity will affect the formula.
The investment
But all the convenience of this method comes at a cost. For Musgrove, it was $140,000. Schilli paid north of $80,000 when he purchased his 20,000-psi system several years ago.
And the work wears hard on the machinery, so there is quite a bit of parts replacement in a year, says Chiapelli, who estimates annual replacement costs at $10,000.
Managers also may need to take a close look at staff when adopting this technology. “Water jetting requires a different mentality than just spraying on bond coat,” Musgrove says.
First, there’s the comfort level. For safety reasons, crews must wear a rain suit and head gear. Combine that with the water’s temperature of up to 180 degrees coming through a 40,000-psi system, and that can be an unpleasant day.
Water blasting also demands more attention to detail. There are safety considerations for handling a water jet that’s strong enough to cut through concrete. Even more tenuous are the parts and equipment that must endure all that pressure. For instance, because manufacturers understand the kind of abuse on the hoses, they often don’t offer a warranty for those parts, meaning crews have to be very careful to protect the sizable investment.
“It cannot be overstated how fragile the equipment is,” Musgrove says. “The hoses are 50 feet long and cost $2,000 apiece. That hose can fail in 10 hours if your guys are just throwing it around.”
Because of this, he spends as much time supervising his water-jetting crews as his plaster professionals.
When graduating to a water-jetting system, employees may expect their paychecks to take a similar trajectory. “My water-jetting crew makes as much as a plaster crew does,” Musgrove says. “The foreman on a water-jetting crew makes as much as a foreman on a plastering crew.”
And where sometimes a single worker could bond coat a pool, he uses a three-person crew for water jetting — one to run the pump and two to perform the jetting.
But to these professionals, the investment makes sense. For Schilli, the equipment paid for itself immediately. In the last year he used a sandblasting contractor, he paid about $160,000.
“So the savings alone [make up for it],” he says. “Plus I can control my schedule now because I’m doing it in-house.”